Include ISO 17025 CNAS & ILAC Test Report
Item No.: 7006-11B-2
Made in China
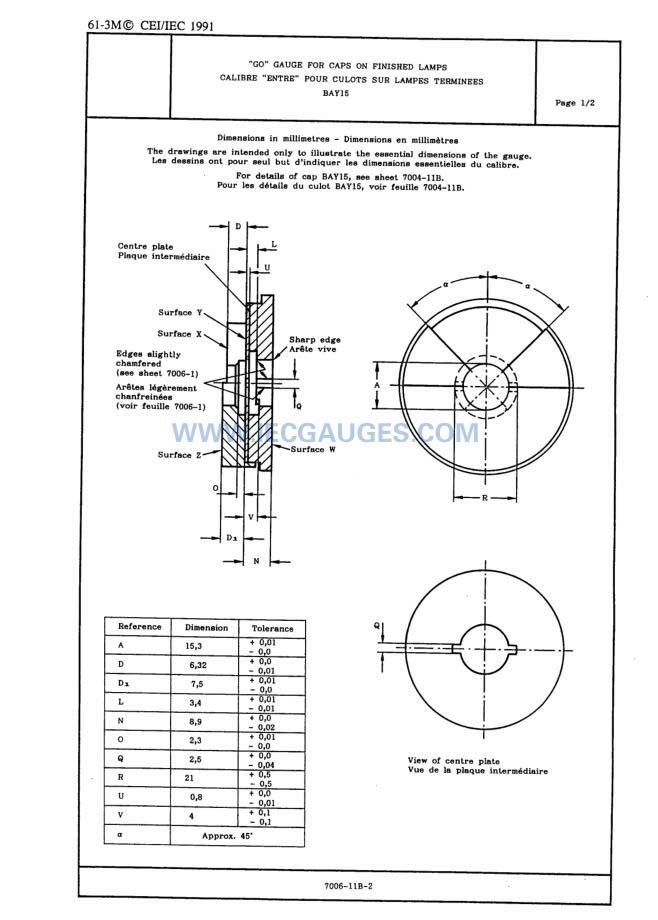
Product description: IEC60061-3: 7006-11B-2 BAY15 Go Gauge for Caps on Finished Lamps. According to standard IEC 60061-3.
IEC60061-3: 7006-11B-2 BAY15 go gauge for Caps on Finished Lamps
PURPOSE: To check dimensions A max., D1 min., D1 max., L max. and the angular displacement of the pins of caps BAY15 on finished lamps.
TESTING:
a) To check dimension A max. and the angular displacement of the pins.
With the cap entering the gauge at surface W and the pins locating in the slots provided, it shall be possible to insert the cap to such a depth that the reference (lower) pin is below surface Y.
To check this, the cap is rotated through approximately 90°in the appropriate direction until the pin is visible in the cutaway.
b) To check dimensions D1 min. and D1 max.
At the successful completion of the test to check dimension A max. in a) above and with the cap still in the gauge, a pull is applied to the cap to bring the upper surface of the reference pin into with surface Y. With the cap in this position, the contact making surfaces shall be co-planar with or project beyond surface X but they shall not project beyond surface Z.
c) To check dimension L max.
With the cap held in the gauge as in b) above with the reference pin visible in the cutaway, the cap is rotated slowly while under tension until the reference pin is not visible in the cutaway.
During the transition, no obstruction to rotation shall be feli.


Contact: Cindy
Phone: +86-13751010017
E-mail: sales@iecgauges.com
Add: 1F Junfeng Building, Gongle, Xixiang, Baoan District, Shenzhen, Guangdong, China